Powered By Blogger

Saturday 9 March 2013

Jambonneau de Poulet

Jambonneau de Poulet or stuffed chicken legs, is a simple dish to make and one where you can impress your friends or anyone else that may turn up unexpected and all with just a little knowledge on how best to butcher your bird.


Having checked my fridge and my larder, I've found a carrot, some asparagus, chicken & mushroom pate (coincidence) along with a tin of cream of chicken soup (another coincidence).
 
Having sorted my ingredients, I now need to portion my bird, here I'm using a small free range corn fed chicken. These birds not only look great with their yellow skin, they taste supreme too.
 

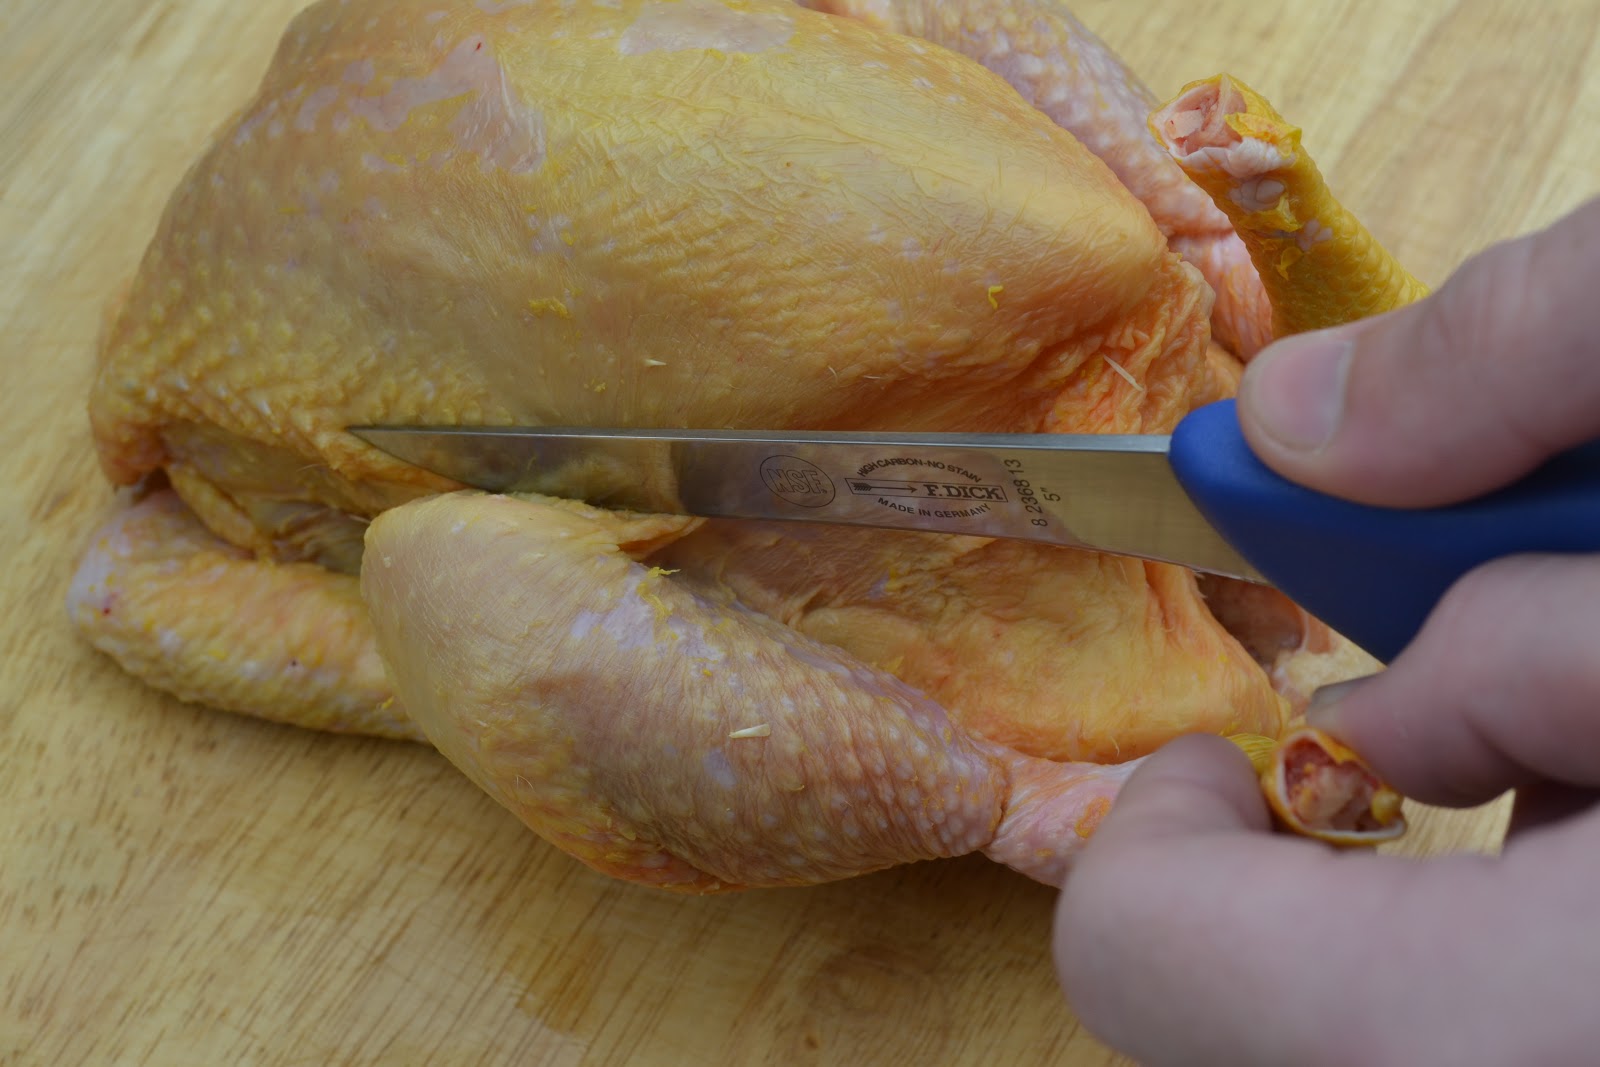
Place your boning knife in-between the thigh and the body of the carcass and draw your knife to the rear of the bird at the same time ensuring you cut through the ball & socket joint.

 
Once you have portioned the leg away from the carcass, you then need to bone out the thigh, ensuring you also take out the knee cap.
 

Then with a pair of poultry shears or a heavy knife, cut off the lower leg above the joint.

 
Tidy up any areas where sinews may potrude along with any loose attached pieces of skin.


Once you have done this, place your thumbs inside the cavity of the drumstick and push the bone until it potrudes out of the small open end.


Now place some filling into the space where the thigh bone had been along with some sitting tight up behind the drumstick bone. Here I've used some chicken & mushroom pate, but you could use some paxo stuffing or perhaps some sausagemeat, the choice is yours.


Having filled your chicken legs with your filling, place the joint inside a muffin mould or similar. Arrange so the joints sit like a pear inside the mould, if you don't have any muffin moulds then use an empty soup can like the one pictured below.


It is best that you wrap some cooking foil around the potruding bone whilst cooking as this will stop the bone turning black and unattractive. Cook for approximately 30 minutes at 180c degrees or until the juices run clear.

 
Once the joint has been cooked, allow the meat to rest and then proceed to slice a good piece or two off the base and then sit the main section down flat on your plate to look like a pear, add the extra slices and arrange nicely. Here I added some steamed vegetables and then finished it with the creamy chicken & mushroom soup as my sauce.
 
The preperation time for this Jambonneau dish was only 20 minutes including the butchery. The cooking time was 30 minutes with additional 10 minutes meat resting time, the whole dish from start to finish was only an hour.
 
 
Why don't you give this dish a go and broaden your butchery skills...
 
By the way, it was just a coincidence that my friends turned up with some white wine ;-)

Wednesday 6 March 2013

Ham Hock Terrine

Theres something really sublime and special about making your own homemade Ham Hock Terrines, they offer class and at the same time they are a household classic. Using the cheap cuts of a pig offers a certain feeling of satisfaction that you are making the most of nose to tail eating thus respecting the pig to very end.


So simple to make, here I've put 4 large ham hocks in a large stock pot together with some pork stock I had made earlier. You could use a vegetable bouillion and a bouquet garni of herbs if you so wish or maybe some local cider, the choice is yours. Two large ham hocks will fill a terrine the size of the one pictured below.


Slow cook for approximately 3 hours or until the meat starts to fall off the bone. Then decant the hocks from the stock and pare the meat away from bones and skin. In a large mixing bowl season the meat to taste if required and then start to add some off the gelatinous stock back to the meat until you reach your desired consistency.


Layer your terrines first with some clingfilm and then the meat to about halfway, then place your desired added ingredients to complement the terrine, here I've added pickled cornichons and some silverskin onions. You may prefer to add a nice bright yellow piccalilli or a wholegrain mustard. I usually add a glug of sherry vinegar at this stage just to help cut through the gelatinous meat.
  

Complete the layers until the terrine is full and then place a piece of wood or cardboard as I've used here and placed in a plastic bag on top of your terrine. Then place some weights on top and place in your fridge for 24 hours to set.

 
Alternatively use a round terrine and place a small plate on top with some weights to help set your terrine.
 
Once your terrine is set, decant onto a larger plate and remove the clingfilm and place in the centre of a table for all to see and admire.
 
 
I've served a wedge of the terrine here along with some wholegrain mustard, caper berries, silverskin onions along with a pickled egg and rye bread.
 
 
Why don't you pop down to your local butchers and ask for some ham hocks and make yourself a ham hock terrine today.